What Is Google Trends?
Google Trends is a free online tool provided by Google that analyzes the popularity of specific keywords or search terms in the Google search engine over time.
It presents data in the form of charts to help users understand the search popularity of a certain topic or keyword, and identifies patterns such as seasonal fluctuations, emerging trends, or declining interest. Google Trends not only supports global data analysis, but also can be refined to specific regions and provide recommendations for related search terms and topics.
Google Trends is widely used in market research, content planning, SEO optimization, and user behavior analysis, helping users make more informed decisions based on data.
How to Scrape Google Trends Data With Python - Step by Step Guide
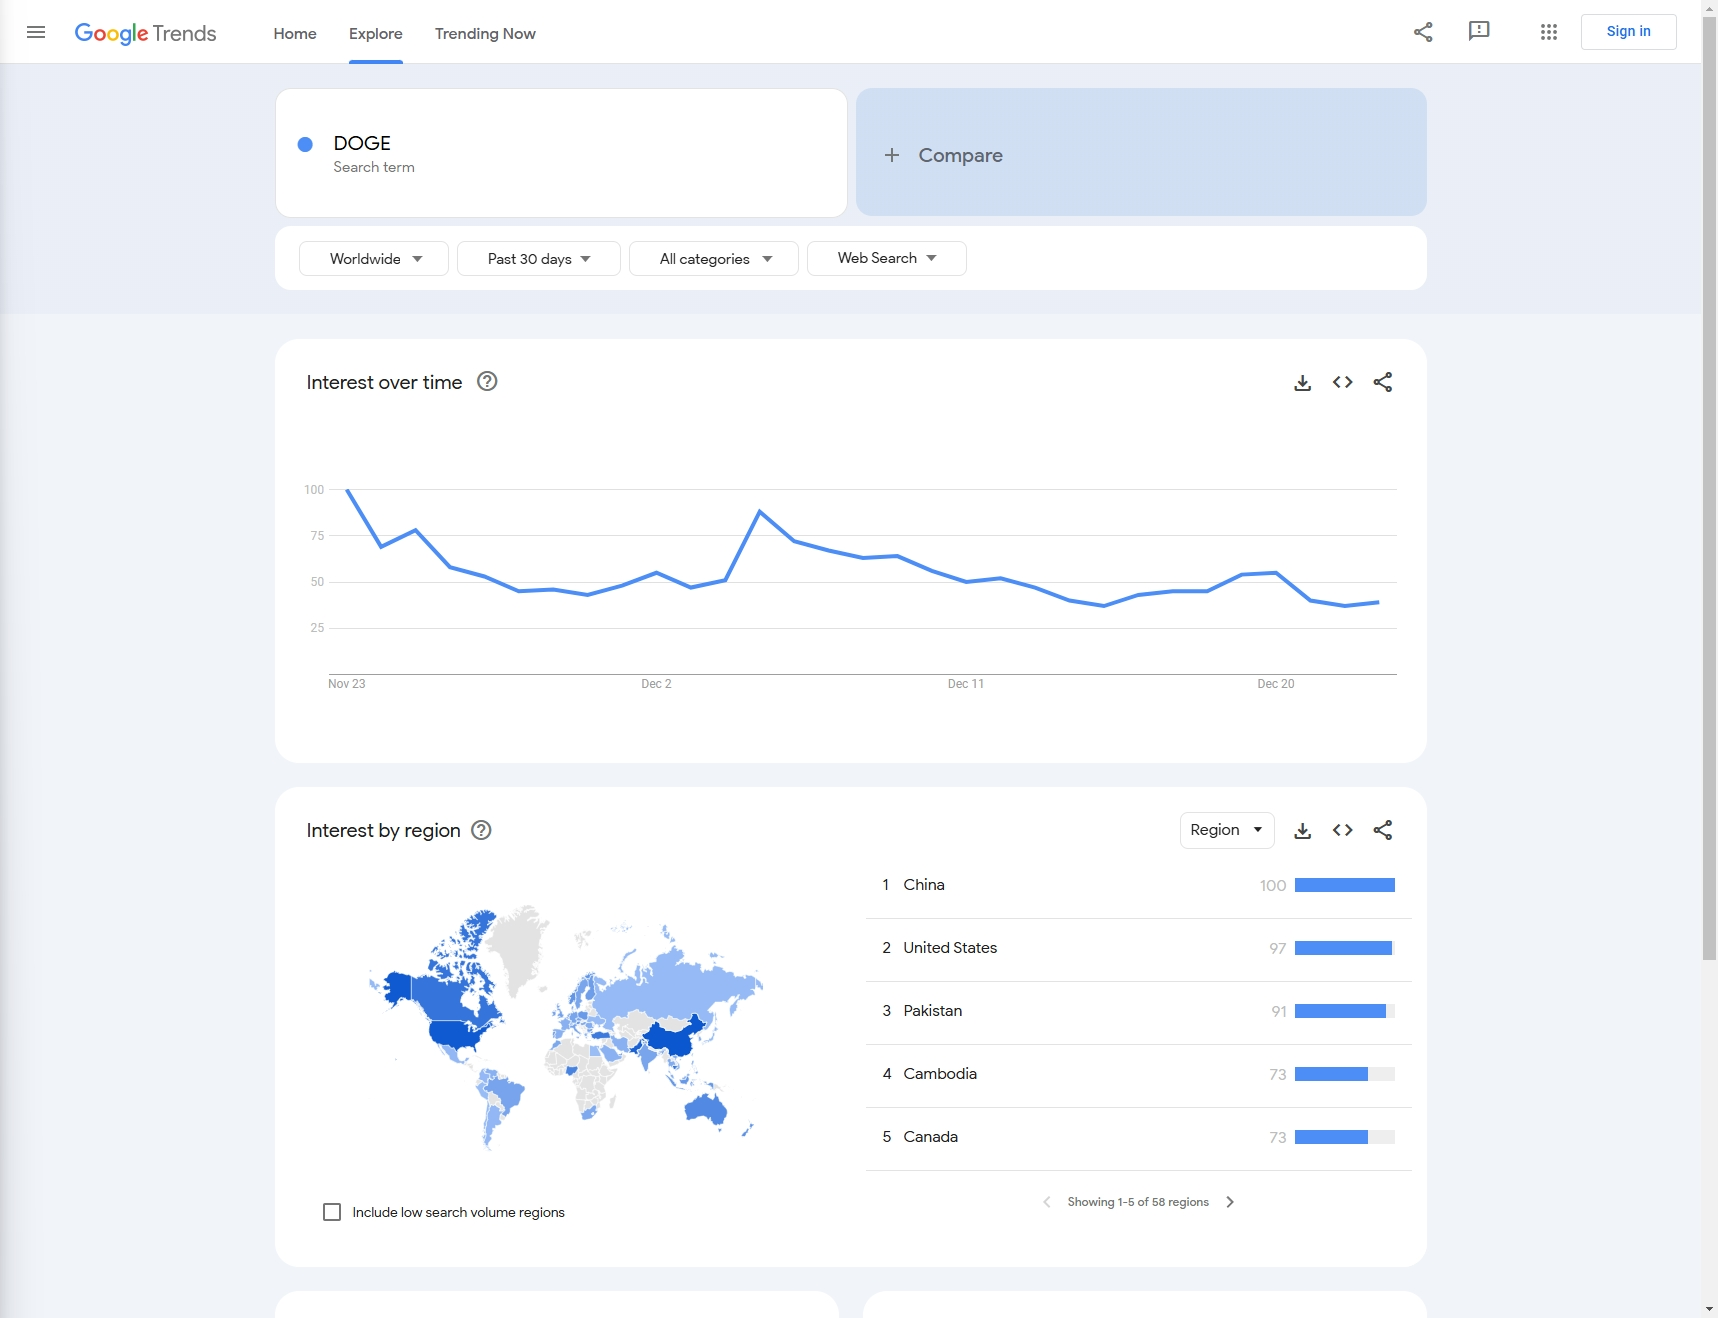
For example: In this article, let's scrape the Google search trends of 'DOGE' from the previous month.
Step 1: Prerequisites
Install Python
On Windows
Using the Official Python Installer
Download Python Installer:
Go to the official Python website.
The website should automatically suggest the latest version for Windows. Click the Download Python button to download the installer.
Run the Installer:
- Open the downloaded
.exefile to start the installation process.
- Open the downloaded
Customize Installation (optional):
Make sure to check the box that says "Add Python to PATH" at the beginning of the installation window. This makes Python accessible from the command line (
cmdor PowerShell).You can also click "Customize installation" to choose additional features like
pip,IDLE, ordocumentation.
Install Python:
Click Install Now to install Python with the default settings.
After installation, you can verify it by opening Command Prompt (
cmd) and typing:python --version
Installing pip (if needed):
Pip, the Python package manager, is installed by default with modern versions of Python. You can check if pip is installed by typing:
pip --version
You can also install Python directly from the Windows Store (available on Windows 10/11). Simply search for "Python" in the Microsoft Store app and choose the version you need.
On macOS
Method 1. Using Homebrew (Recommended)
Install Homebrew (if not already installed):
Open the Terminal app.
Paste the following command to install Homebrew (package manager for macOS):
/bin/bash -c "$(curl -fsSL https://raw.githubusercontent.com/Homebrew/install/HEAD/install.sh)"
Install Python with Homebrew:
Once Homebrew is installed, you can install Python with this command:
brew install python
Verify Installation:
After installation, you can verify Python and pip versions with the following commands:
  python3 --version
  pip3 --version
Method 2. Using the Official Python Installer
Download the macOS Installer:
Go to the Python Downloads Page.
Download the latest macOS installer for Python.
Run the Installer:
- Open the
.pkgfile to start the installation process and follow the instructions.
- Open the
Verify Installation:
After installation, open Terminal and check the Python version:
  python3 --version
  pip3 --version
On Linux
For Debian/Ubuntu-based Distributions
Update Package List:
Open a terminal and run the following command to update the package list:
sudo apt update
Install Python:
To install Python 3 (usually the latest version of Python 3.x), run:
sudo apt install python3
Install pip (if not installed):
If pip is not already installed, you can install it with:
sudo apt install python3-pip
Verify Installation:
To check the installed Python version:
  python3 --version
  pip3 --version
For Red Hat/Fedora-based Distributions
Install Python 3:
Open a terminal and run:
sudo dnf install python3
Install pip (if necessary):
If
pipis not installed by default, you can install it with:sudo dnf install python3-pip
Verify Installation:
To check the installed Python version:
  python3 --version
  pip3 --version
For Arch Linux and Arch-based Distros
Install Python 3:
Run the following command:
sudo pacman -S python
Install pip:
Pip should be installed with Python, but if not, you can install it with:
sudo pacman -S python-pip
Verify Installation:
To check the Python and pip versions:
  python --version
  pip --version
Using Python via Anaconda (Cross-platform)
Anaconda is a popular distribution for scientific computing and comes with Python, libraries, and the conda package manager.
Download Anaconda:
- Visit the Anaconda Downloads Page and download the appropriate version for your platform.
Install Anaconda:
- Follow the installation instructions based on your operating system. Anaconda provides a graphical installer for both Windows and macOS, as well as command-line installers for all platforms.
Verify Installation:
After installation, open a terminal (or Anaconda Prompt on Windows) and check if Python is working:
python --versionYou can also verify
conda(the package manager for Anaconda):conda --version
Managing Python Versions (optional)
If you need to manage multiple Python versions on the same machine, you can use version managers:
pyenv: A popular Python version manager that works on Linux and macOS.
Install via Homebrew or GitHub (for Linux and macOS).
On Windows, you can use pyenv-win.
    pyenv install 3.9.0
    pyenv global 3.9.0
Access to scrapeless API and Google trends
Since we have not yet developed a third-party library for use, you only need to install requests to experience the scrapeless API service
pip install requests
Step 2: Configure the code fields that need
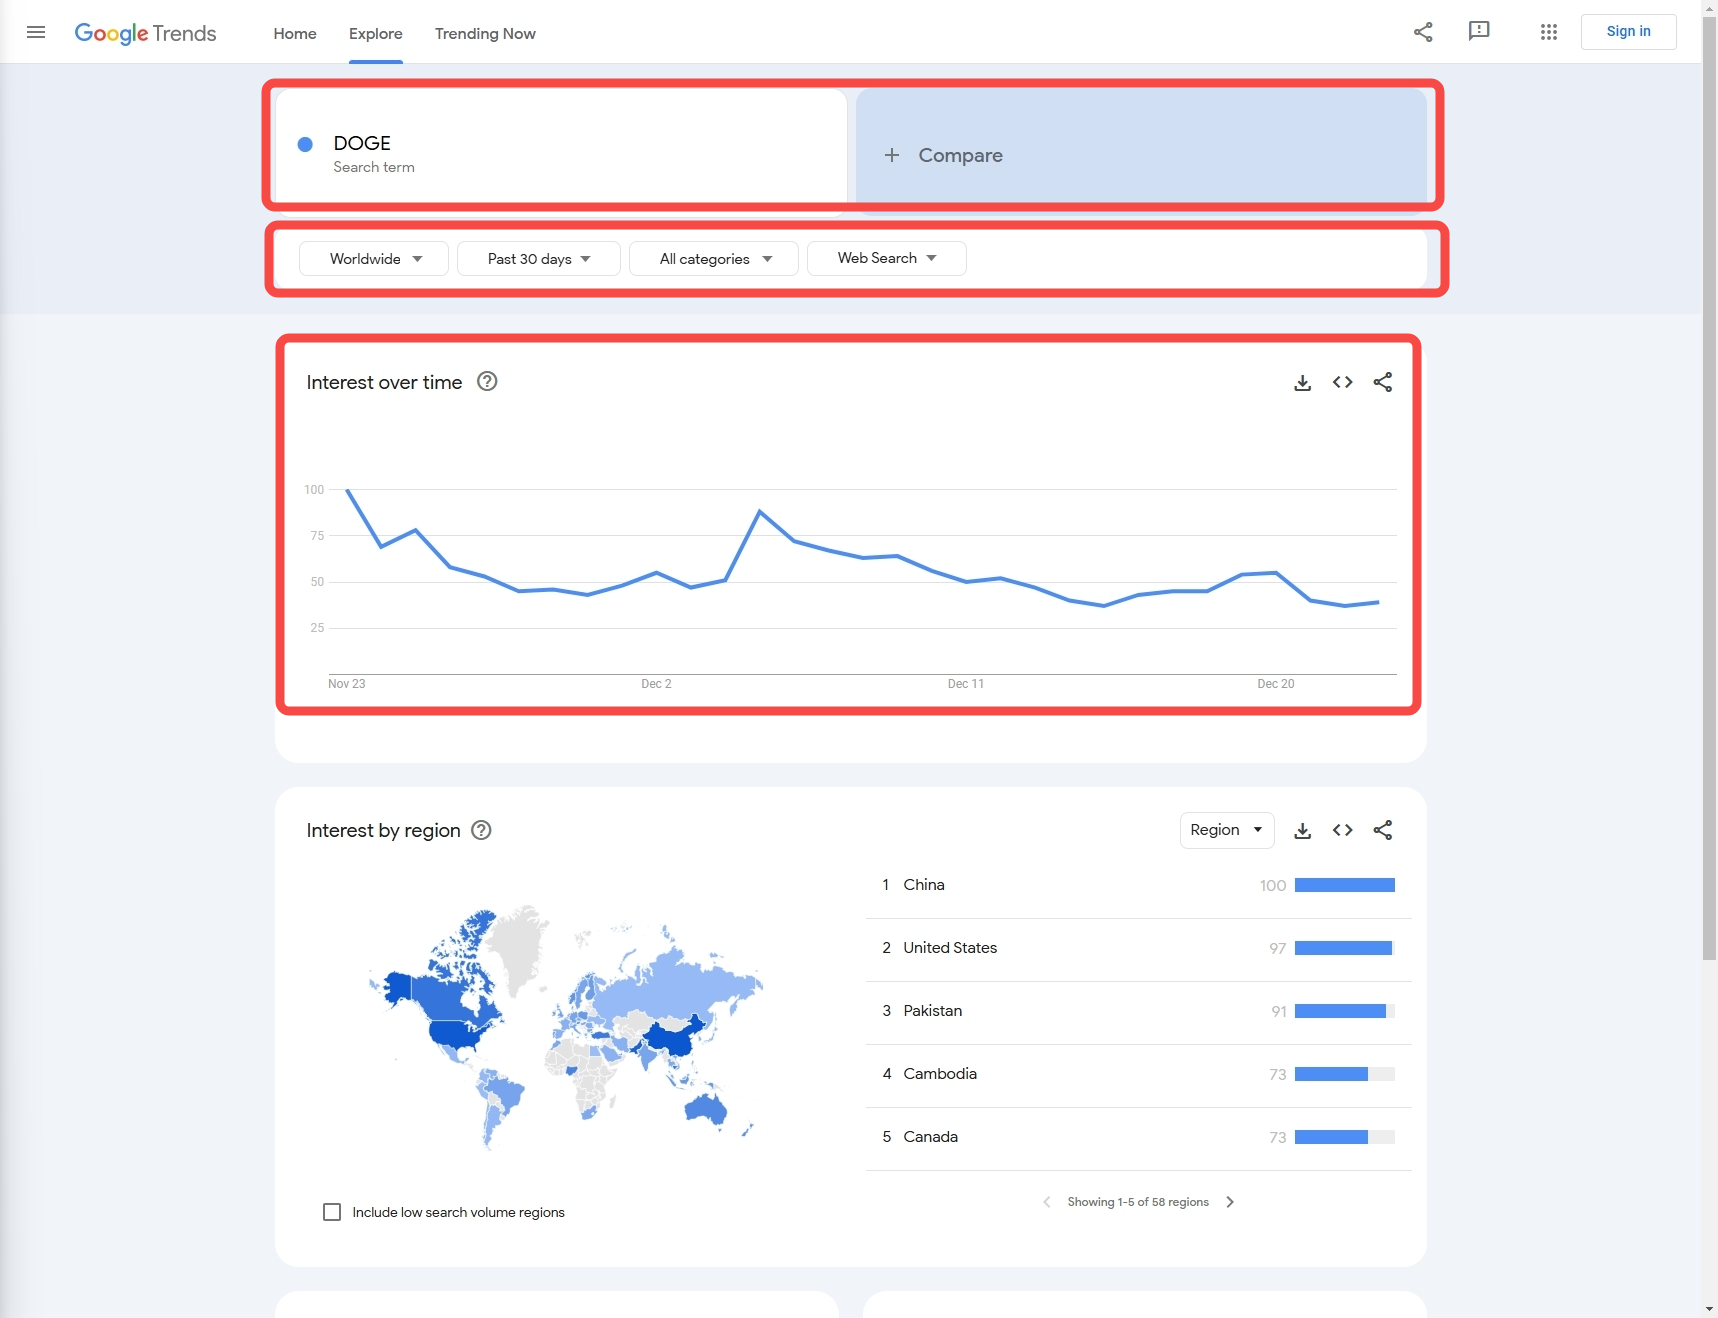
Next, we need to know how to obtain the data we need through configuration:
Keyword: In this example, our keyword is 'DOGE' (we also support the collection of multiple keyword comparison data)
Data configuration:
Country: Query country, the default is 'Worldwide'
Time: Time period
Category: Type
Property: Source
Step 3: Extracting data
Now, let's get the target data using Python code:
import json
import requests


class Payload:
    def __init__(self, actor, input_data, proxy):
        self.actor = actor
        self.input = input_data
        self.proxy = proxy


def send_request(data_type, search_term):
    host = "api.scrapeless.com"
    url = f"https://{host}/api/v1/scraper/request"
    token = "scrapeless-api-key"  # TODO:use your api key

    headers = {"x-api-token": token}

    input_data = {
        "q": search_term,
        "date": "today 1-m",
        "data_type": data_type,
        "hl": "en-sg",
        "tz": "-480",
        "geo": "",
        "cat": "",
        "property": "",
    }

    proxy = {
        "country": "ANY",
    }

    payload = Payload("scraper.google.trends", input_data, proxy)

    json_payload = json.dumps(payload.__dict__)

    response = requests.post(url, headers=headers, data=json_payload)

    if response.status_code != 200:
        print("Error:", response.status_code, response.text)
        return

    print("body", response.text)


if __name__ == "__main__":
    send_request(data_type="interest_over_time", search_term="DOGE")
- Output:
{"interest_over_time":{"averages":[],"timelineData":[{"formattedAxisTime":"24 Nov","formattedTime":"24 Nov 2024","formattedValue":["85"],"hasData":[true],"time":"1732406400","value":[85]},{"formattedAxisTime":"25 Nov","formattedTime":"25 Nov 2024","formattedValue":["89"],"hasData":[true],"time":"1732492800","value":[89]},{"formattedAxisTime":"26 Nov","formattedTime":"26 Nov 2024","formattedValue":["68"],"hasData":[true],"time":"1732579200","value":[68]},{"formattedAxisTime":"27 Nov","formattedTime":"27 Nov 2024","formattedValue":["60"],"hasData":[true],"time":"1732665600","value":[60]},{"formattedAxisTime":"28 Nov","formattedTime":"28 Nov 2024","formattedValue":["49"],"hasData":[true],"time":"1732752000","value":[49]},{"formattedAxisTime":"29 Nov","formattedTime":"29 Nov 2024","formattedValue":["55"],"hasData":[true],"time":"1732838400","value":[55]},{"formattedAxisTime":"30 Nov","formattedTime":"30 Nov 2024","formattedValue":["54"],"hasData":[true],"time":"1732924800","value":[54]},{"formattedAxisTime":"1 Dec","formattedTime":"1 Dec 2024","formattedValue":["55"],"hasData":[true],"time":"1733011200","value":[55]},{"formattedAxisTime":"2 Dec","formattedTime":"2 Dec 2024","formattedValue":["64"],"hasData":[true],"time":"1733097600","value":[64]},{"formattedAxisTime":"3 Dec","formattedTime":"3 Dec 2024","formattedValue":["57"],"hasData":[true],"time":"1733184000","value":[57]},{"formattedAxisTime":"4 Dec","formattedTime":"4 Dec 2024","formattedValue":["61"],"hasData":[true],"time":"1733270400","value":[61]},{"formattedAxisTime":"5 Dec","formattedTime":"5 Dec 2024","formattedValue":["100"],"hasData":[true],"time":"1733356800","value":[100]},{"formattedAxisTime":"6 Dec","formattedTime":"6 Dec 2024","formattedValue":["84"],"hasData":[true],"time":"1733443200","value":[84]},{"formattedAxisTime":"7 Dec","formattedTime":"7 Dec 2024","formattedValue":["79"],"hasData":[true],"time":"1733529600","value":[79]},{"formattedAxisTime":"8 Dec","formattedTime":"8 Dec 2024","formattedValue":["72"],"hasData":[true],"time":"1733616000","value":[72]},{"formattedAxisTime":"9 Dec","formattedTime":"9 Dec 2024","formattedValue":["64"],"hasData":[true],"time":"1733702400","value":[64]},{"formattedAxisTime":"10 Dec","formattedTime":"10 Dec 2024","formattedValue":["64"],"hasData":[true],"time":"1733788800","value":[64]},{"formattedAxisTime":"11 Dec","formattedTime":"11 Dec 2024","formattedValue":["63"],"hasData":[true],"time":"1733875200","value":[63]},{"formattedAxisTime":"12 Dec","formattedTime":"12 Dec 2024","formattedValue":["59"],"hasData":[true],"time":"1733961600","value":[59]},{"formattedAxisTime":"13 Dec","formattedTime":"13 Dec 2024","formattedValue":["54"],"hasData":[true],"time":"1734048000","value":[54]},{"formattedAxisTime":"14 Dec","formattedTime":"14 Dec 2024","formattedValue":["48"],"hasData":[true],"time":"1734134400","value":[48]},{"formattedAxisTime":"15 Dec","formattedTime":"15 Dec 2024","formattedValue":["43"],"hasData":[true],"time":"1734220800","value":[43]},{"formattedAxisTime":"16 Dec","formattedTime":"16 Dec 2024","formattedValue":["48"],"hasData":[true],"time":"1734307200","value":[48]},{"formattedAxisTime":"17 Dec","formattedTime":"17 Dec 2024","formattedValue":["55"],"hasData":[true],"time":"1734393600","value":[55]},{"formattedAxisTime":"18 Dec","formattedTime":"18 Dec 2024","formattedValue":["52"],"hasData":[true],"time":"1734480000","value":[52]},{"formattedAxisTime":"19 Dec","formattedTime":"19 Dec 2024","formattedValue":["63"],"hasData":[true],"time":"1734566400","value":[63]},{"formattedAxisTime":"20 Dec","formattedTime":"20 Dec 2024","formattedValue":["64"],"hasData":[true],"time":"1734652800","value":[64]},{"formattedAxisTime":"21 Dec","formattedTime":"21 Dec 2024","formattedValue":["47"],"hasData":[true],"time":"1734739200","value":[47]},{"formattedAxisTime":"22 Dec","formattedTime":"22 Dec 2024","formattedValue":["44"],"hasData":[true],"time":"1734825600","value":[44]},{"formattedAxisTime":"23 Dec","formattedTime":"23 Dec 2024","formattedValue":["44"],"hasData":[true],"time":"1734912000","value":[44]},{"formattedAxisTime":"24 Dec","formattedTime":"24 Dec 2024","formattedValue":["46"],"hasData":[true],"isPartial":true,"time":"1734998400","value":[46]}]}}
Step 4: Optimize code
- Configure multiple countries
country_map = {
        "Worldwide": "ANY",
        "Afghanistan":"AF",
        "Åland Islands":"AX",
        "Albania":"AL",
        #...
    }
- Configure multiple time periods
time_map = {
        "Past hour":"now 1-H",
        "Past 4 hours":"now 4-H",
        "Past 7 days":"now 7-d",
        "Past 30 days":"today 1-m",
        # ...
    }
- Configure multiple categories
category_map = {
        "All categories": 0,
        "Arts & Entertainment": 3,
        "Autos & Vehicles": 47,
        # ...
    }
- Configure multiple sources
property_map = {
        "Web Search":"",
        "Image Search":"images",
        "Google Shopping":"froogle",
         # ...
    }
- Improved code:
import json
import requests

country_map = {
    "Worldwide": "",
    "Afghanistan": "AF",
    "Åland Islands": "AX",
    "Albania": "AL",
    # ...
}
time_map = {
    "Past hour": "now 1-H",
    "Past 4 hours": "now 4-H",
    "Past 7 days": "now 7-d",
    "Past 30 days": "today 1-m",
    # ...
}
category_map = {
    "All categories": "",
    "Arts & Entertainment": "3",
    "Autos & Vehicles": "47",
    # ...
}
property_map = {
    "Web Search": "",
    "Image Search": "images",
    "Google Shopping": "froogle",
    # ...
}


class Payload:
    def __init__(self, actor, input_data, proxy):
        self.actor = actor
        self.input = input_data
        self.proxy = proxy


def send_request(data_type, search_term, country, time, category, property):
    host = "api.scrapeless.com"
    url = f"https://{host}/api/v1/scraper/request"
    token = "scrapeless-api-key"  # TODO:use your api key

    headers = {"x-api-token": token}

    input_data = {
        "q": search_term,  # search term
        "geo": country,
        "date": time,
        "cat": category,
        "property": property,
        "hl": "en-sg",
        "tz": "-480",
        "data_type": data_type
    }

    proxy = {
        "country": "ANY",
    }

    payload = Payload("scraper.google.trends", input_data, proxy)

    json_payload = json.dumps(payload.__dict__)

    response = requests.post(url, headers=headers, data=json_payload, verify=False)

    if response.status_code != 200:
        print("Error:", response.status_code, response.text)
        return

    print("body", response.text)


if __name__ == "__main__":
    # one search_term
    send_request(
        data_type="interest_over_time",
        search_term="DOGE",
        country=country_map["Worldwide"],
        time=time_map["Past 30 days"],
        category=category_map["Arts & Entertainment"],
        property=property_map["Web Search"],
    )
    # two search_term
    send_request(
        data_type="interest_over_time",
        search_term="DOGE,python",
        country=country_map["Worldwide"],
        time=time_map["Past 30 days"],
        category=category_map["Arts & Entertainment"],
        property=property_map["Web Search"],
    )
Problems in the crawling process
We need to make judgments on some network errors to prevent errors from causing shutdowns;
Adding a certain retry mechanism can prevent interruptions in the crawling process from causing duplicate/invalid data acquisition.
Testing with Scrapeless scraping API - the best Google Trends scraper
Step 1. Log in to Scrapeless
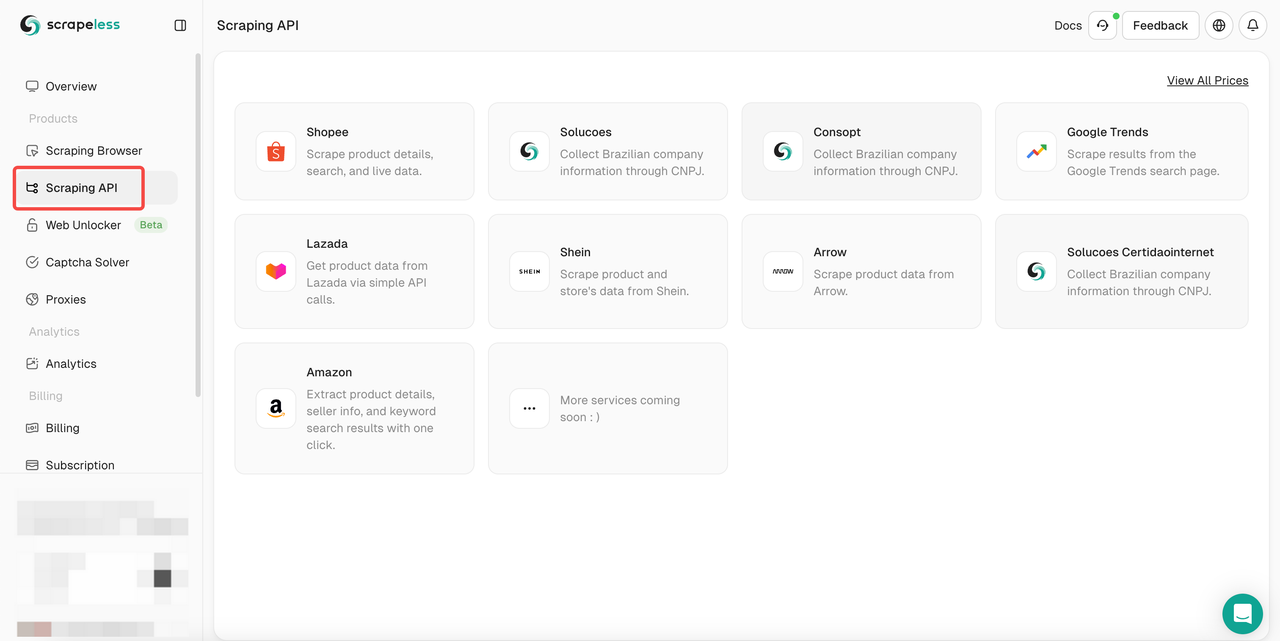
Step 2. Click the "Scraping API"
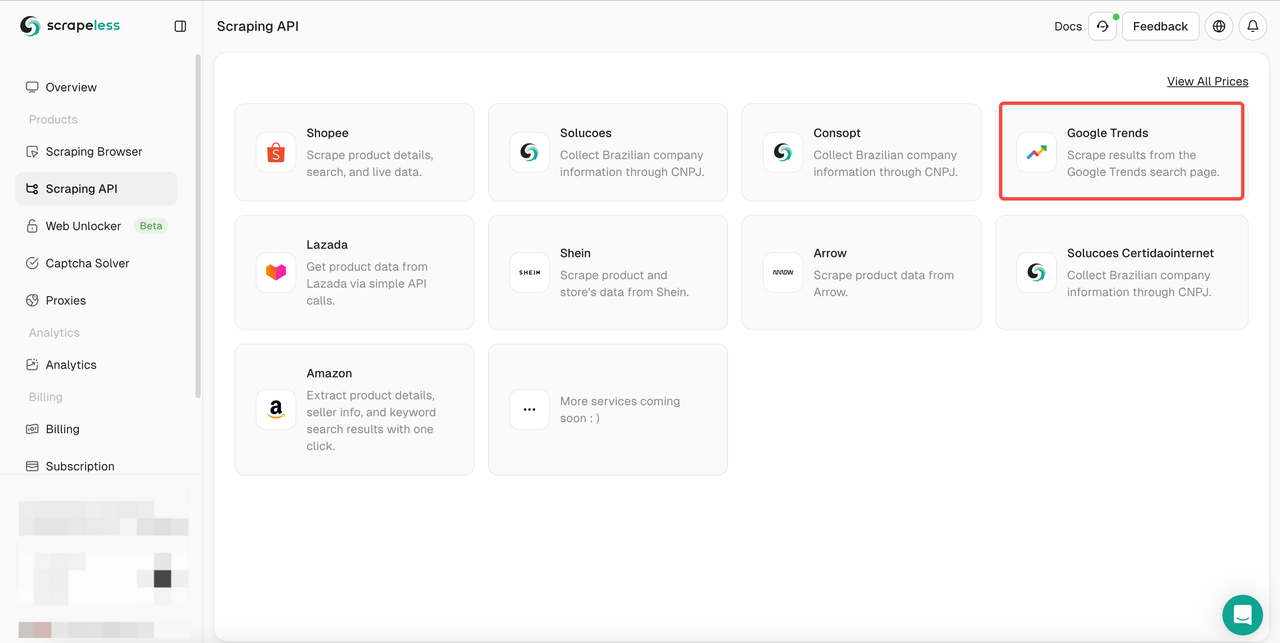
- Step 3. Find our "Google Trends" Panel and enter it:
- Step 4. Configure your data in the left operation panel:
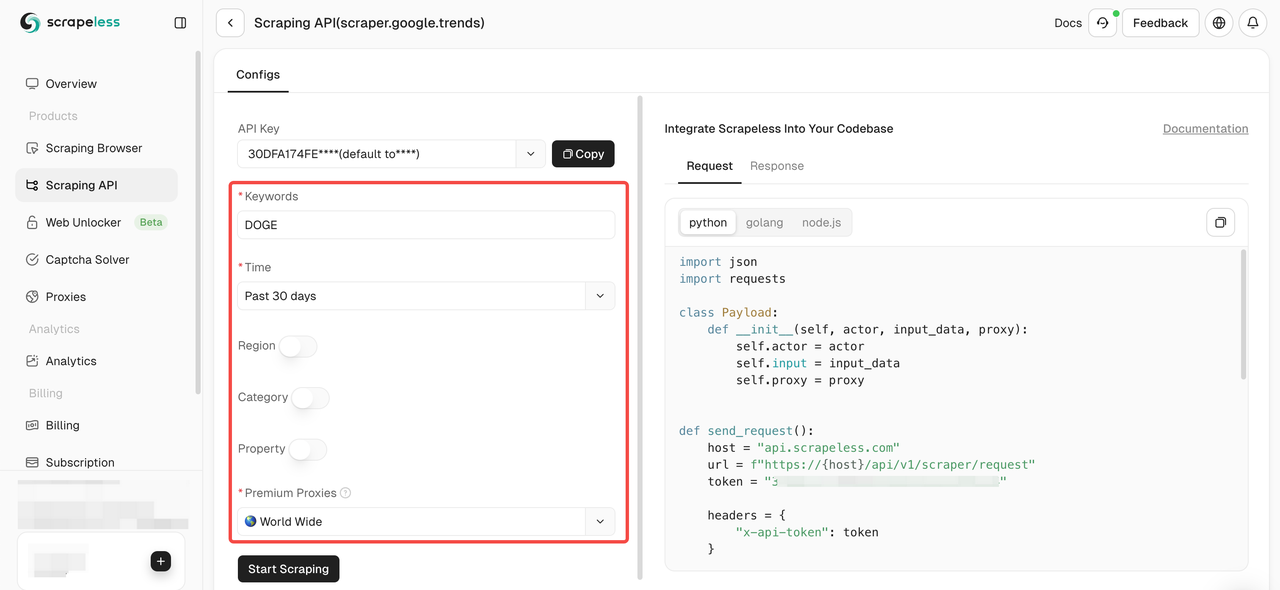
- Step 5. Click the "Start Scraping" button and then you can get the result:
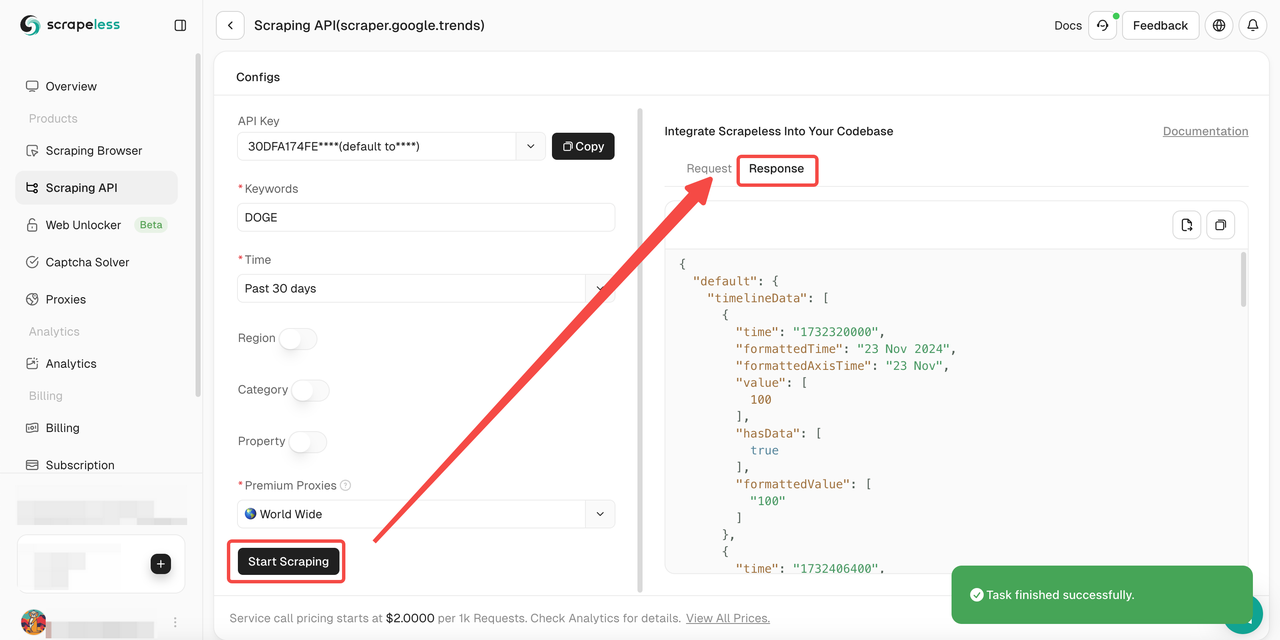
Besides, you can also refer to the sample codes.
Scrapeless Google Trends API: Whole Understanding
Scrapeless is an innovative solution designed to simplify the process of extracting data from websites. Our API is designed to navigate the most complex web environments and effectively manage dynamic content and JavaScript rendering.
Why Scrapeless works well to scrape Google Trends?
If we use Python coding to crawl Google Trends alone, we will easily encounter the reCAPTHCA verification system. This brings great challenges to our crawling process.
However, Scrapeless Google Trends Scraping API integrates CAPTCHA solver and intelligent IP rotation, so there is no need to worry about being monitored and identified by the website. Scrapeless guarantees a 99.9% website crawling success rate, providing you with a completely stable and safe data crawling environment.
4 typical advantages of Scrapeless
Competitive price Scrapeless is not only powerful, but also guarantees a more competitive market price. Scrapeless Google trends scraping API service call pricing starts at $2 per 1k successful requests.
Stability Extensive experience and robust systems ensure reliable, uninterrupted scraping with advanced CAPTCHA-solving capabilities.
Speed A vast proxy pool guarantees efficient, large-scale scraping without IP blocks or delays.
Cost-Effective Proprietary technology minimizes costs, allowing us to offer competitive pricing without compromising quality.
SLAS Guarantee Service-level agreements ensure consistent performance and reliability for enterprise needs.
FAQs
Is it legal to scrape Google Trends?
Yes, it is completely legal to scrape the global, publicly available Google Trends data. However, please don't damage your site by sending too many requests in a short period of time.
Is Google Trends misleading?
Google Trends is not a complete reflection of search activity. Google Trends filters out certain types of searches, such as searches that are performed by very few people. Trends only shows data for popular terms, so terms with low search volume will show as "0"
Does Google Trends provide an API?
No, Google Trends does not yet provide a public API. However, you can access Google Trends data from private APIs in third-party developer tools, such as Scrapeless.
Final Thoughts
Google Trends is a valuable data integration tool that provides keyword analysis and popular search topics by analyzing search queries on search engines. In this article, we show in depth how to scrape Google Trends using Python.
However, scraping Google Trends using python coding always encounters the CAPTCHA obstacle. It makes your data extraction particularly difficult. Although the Google Trends API is not available, the Scrapeless Google Trends API will be your ideal tool!